
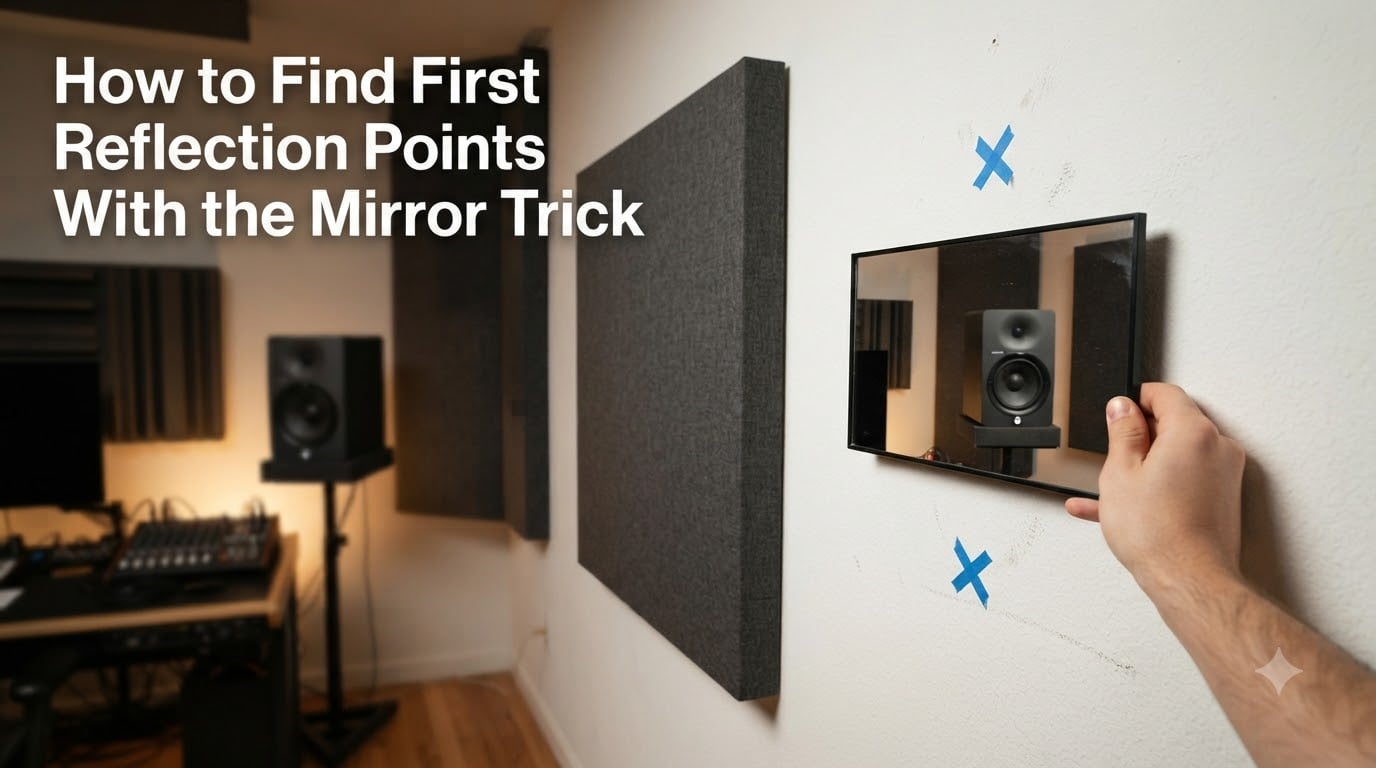
When we first set up our home studio, we couldn’t figure out why our mixes sounded great on headphones but muddy in the room. The answer was hiding on our walls. We had untreated first reflection points bouncing sound back into our ears milliseconds after the direct sound from the speakers, smearing every detail in our mixes.
The fix was almost embarrassingly simple. A small mirror, ten minutes of our time, and a patient friend. This is the mirror trick, and it’s been the go-to method for locating first reflection points in acoustic treatment for decades. Professional studio designers use it because it works on any room, with any speaker placement, and requires zero math.
In this guide, we’ll walk through exactly how to find first reflection points with the mirror trick, including a solo technique for those of you working alone. We’ll cover walls, ceilings, and the common mistakes that lead to misaligned panels. By the end, you’ll know precisely where to place acoustic treatment in your room and why that location matters.
Table of Contents
What Are First Reflection Points and Why Do They Matter
First reflection points are the spots on your walls, ceiling, and sometimes floor where sound from your speakers bounces and reaches your ears shortly after the direct sound. The acoustic definition is straightforward: any sound that arrives at your listening position within roughly 20 to 30 milliseconds of the direct sound counts as an early reflection.
The Physics of Sound Reflection in Your Room
Sound waves travel in straight lines until they hit something solid. When they strike a hard surface like drywall, plaster, or glass, they bounce off at an angle equal to the angle they arrived. This is the same principle as light bouncing off a mirror, and it’s why the mirror trick works. The angle of incidence equals the angle of reflection.
In an untreated room, your speakers fire sound in two directions at once: directly at you, and outward toward the side walls. The wall reflections travel a slightly longer path before they reach your ears, which means they arrive a few milliseconds late. Your brain hears both the direct sound and the reflected sound as a single, slightly distorted signal.
What Happens When You Don’t Treat Reflection Points
The most common problem from early reflections is something called comb filtering. When two copies of the same sound arrive at slightly different times, they cancel out certain frequencies and boost others, creating a comb-like pattern of peaks and dips across the frequency spectrum. The result is a smeared, hollow sound that lacks clarity.
Stereo imaging also suffers when reflection points are untreated. Your brain uses tiny timing differences between your left and right ears to place sounds in space. Reflected sound contaminates this signal, so instruments sound blurry or pulled to one side instead of sitting precisely in the stereo field.
Many of us in the SK Records community have reported that treating just the side wall reflections cleaned up our low-mids and tightened bass response in a way we didn’t expect. It’s often described as going from “woolly and confused” to “tight and focused,” and the difference is usually obvious after the very first panel goes up.
How Does the Mirror Trick Work?
The mirror trick is based on a simple geometric principle: if you can see your speaker reflected in a mirror placed on a wall, sound from that speaker is also bouncing off that exact spot. Your line of sight to the mirror reflection traces the same path your ear takes to receive the reflected sound. The mirror effectively shows you where the acoustic reflection would land.
The Principle Behind the Mirror Technique
Imagine drawing a straight line from your speaker to a point on the wall, and then another straight line from that point to your ear. That triangle is the path the reflected sound travels. The mirror trick helps you find the point on the wall where those two lines meet. When you stand at your listening position and peer at a mirror flat against the wall, you’re looking along the second line of that triangle, toward a point on the wall that’s directly equidistant from you and the speaker.
Any spot where you can see your speaker’s tweeter in the mirror is a first reflection point. The mid and high frequencies that come off those drivers are the ones your ear is most sensitive to, and they’re the ones most affected by the angle of reflection.
What You’ll Need Before You Start
Gather these items before you start the mirror trick process. None of them are expensive, and most of you probably have them around the house already.
A small flat mirror, roughly 6 by 10 inches works well
Painter’s tape or removable stickers for marking spots
A friend or family member to help move the mirror
A pencil or fine marker for precise marking
Optional: a phone with a camera for solo testing
Optional: a level or tape measure if you want exact placement
The mirror should be flat rather than curved. A compact mirror from a makeup bag, a bathroom mirror, or any small flat reflective surface will work. Avoid magnifying mirrors because they distort the reflected image and make it harder to identify exact positions.
The Mirror Trick Step-by-Step
Below is the exact procedure our team uses when setting up new rooms. It takes about 10 minutes for the side walls and another 5 minutes each for the ceiling and any rear wall reflections. We’ll assume a standard two-channel listening setup, but the same process works for surround sound or multi-speaker arrangements.
Step 1: Set Up Your Listening Position
Sit in your actual mixing or listening position. This is where your ears will be when you work, so it has to be the reference point for the entire process. Use your real chair, your real desk height, and your real seated posture. Don’t stand, don’t lean forward, and don’t estimate.
Make sure your speakers are positioned where they will actually stay during normal use. If you have powered monitors, leave them on with a quiet test track playing so you can hear when reflections occur during the test. Some engineers prefer to work in silence during the mirror test, since the visual mirror is enough to identify the spots.
Step 2: Have a Helper Move the Mirror
Ask your helper to hold the mirror flat against the side wall, starting about a foot in front of the speaker and slowly moving it back toward the listening position. The mirror should be flat against the wall, with the reflective side facing you.
From your seat, watch the mirror as it moves. When you can see the reflection of the speaker’s tweeter in the mirror, call out and have your helper stop. That spot is the first reflection point for that side wall and that speaker. Mark the location with painter’s tape before the mirror moves again.
Step 3: Mark Each Reflection Point
Repeat the process for each speaker and each surface you want to test. For a two-channel setup, you’ll mark one spot on the left wall and one on the right wall. Mark each location carefully with tape so you can step back and see the full pattern when you’re done.
Don’t just mark a single point. Mirror your line of sight up and down vertically as well, marking the entire vertical band where you can see the tweeter. First reflection points aren’t really points, they’re zones that extend vertically about 12 to 18 inches depending on your speaker height and listening position.
Step 4: Verify Your Marks
Once you’ve marked all the spots, have your friend stand back and confirm the marks look reasonable. The marks should fall roughly halfway between your listening position and the speaker, both horizontally and vertically. In a typical rectangular room, that’s somewhere between 1 and 4 feet behind the speakers, depending on room proportions.
If anything looks off, redo that mirror test before you start installing treatment. The placement of acoustic panels is much harder to fix after you’ve drilled holes in your walls.
How to Do the Mirror Test Solo?
The most common frustration with the mirror trick is that it requires two people. We get it, many of us record alone, mix alone, and have no one nearby to hold a mirror. Here are two solo mirror test techniques that work just as well as the two-person version.
The Tape Method for Solo Mirror Testing
This is the simplest solo mirror technique and works well for side wall reflections. Start by taping a sheet of plain white paper to your side wall at the height of your speakers. Mark your listening position on the floor with a small piece of tape so you can return to the same spot every time.
Sit in your listening position and look at the wall. Use a laser pointer, a flashlight, or even a small flat mirror held at an angle to trace the line from your ear to the wall. Where that line lands on the wall is approximately the first reflection point. You can also use a long stick or yardstick laid flat against the wall, angling it from your ear toward the speaker, and the spot where it crosses the wall is your reflection zone.
Mark the spot with painter’s tape, then stand up and verify visually before moving on. Repeat for the other side wall. The technique is slightly less precise than the two-person mirror method but still gets you within a few inches of the correct location.
Using a Camera or Phone Tripod
If you have a phone tripod or any adjustable stand, mount the small mirror to it and set it against the wall at approximate reflection height. Sit in your listening position and use your phone’s front-facing camera as a remote viewfinder, propped against something on your desk and pointed at your reflection spot.
Adjust the mirror and stand until you can see the speaker’s tweeter reflected. Mark the spot with tape. This method takes a few tries to get the mirror angle right, but it’s the closest solo technique to the original mirror trick.
Another approach we’ve seen work well: lay the mirror flat on the floor in front of the wall, slide it toward the wall while looking at it from your chair, and find the angle where the speaker reflection appears. Mark where the mirror meets the wall, and that gives you a good approximation of the first reflection height. For the horizontal position, you’ll still need to estimate by eye or use the laser pointer method.
Finding Reflection Points on Different Surfaces
The mirror trick works on more than just side walls. Every reflective surface in your room that the speakers can “see” from your listening position will have a first reflection point. Here’s how to approach each one.
Side Wall Reflection Points
Side wall reflections are the most critical to treat first because they’re the strongest and arrive earliest. In a typical rectangular room, your speakers fire across the room at angles that bounce off the left and right walls before reaching your ears. These reflections often arrive 5 to 15 milliseconds after the direct sound, well within the window your brain interprets as one signal.
The mirror trick for side walls is straightforward. Have your helper slide the mirror along the wall between the speaker and your listening position. Mark every spot where you can see the tweeter, from a foot in front of the speaker to a foot behind your head. You’ll typically end up with one or two main clusters per side.
Ceiling Reflection Points
Ceiling reflections matter just as much as wall reflections, especially in rooms with low or angled ceilings. The mirror trick works on ceilings too, but you’ll need a helper comfortable on a small step stool. Have them hold the mirror flat against the ceiling between the speakers and your listening position.
From your chair, look up. Mark every spot where you can see the tweeter in the mirror. The ceiling reflection typically falls somewhere between the speakers and your head, often slightly forward of your listening position.
For ceiling treatment, a single cloud panel (a horizontal panel hanging above the mix position) usually covers the entire reflection zone. Many producers mount one above the desk and one between the speakers and the listening position for full coverage.
Front and Back Wall Reflection Points
The front wall behind the speakers often reflects sound back into the room, but since it’s behind the speakers, these reflections are usually weaker and arrive later. Many studios leave the front wall untreated or use diffusion there instead of absorption.
The back wall behind the listening position is more critical. Slap echoes, flutter echoes, and late reflections all originate here. The mirror trick still works, but you’ll have your helper hold the mirror on the back wall while you look forward. Mark the spot where the speaker disappears from view in the mirror, roughly opposite your head.
Vocal Booth and Small Room Considerations
In small rooms and vocal booths, the mirror trick works the same way but the reflection points often cluster closer together because the distances are shorter. The walls, ceiling, and even the desk surface can all create first reflections in a tightly enclosed space.
For vocal recording, focus on the reflection points between the singer’s mouth and the microphone. The microphone should be the “listening position” for these tests, because that’s where the acoustic problems will land. Use the mirror trick on each wall visible from the mic position and treat accordingly.
Common Mirror Trick Mistakes to Avoid
Over the years, we’ve seen the same handful of mistakes trip people up. Avoiding these will save you time and ensure your treatment ends up in the right places.
Standing Instead of Sitting
The single biggest mistake is doing the mirror test while standing up. Your ear height when sitting is different from when standing, which changes the reflection angle and shifts the reflection point by several inches. Always sit in your real position with your real posture. We recommend closing your eyes briefly, relaxing, and opening them as if you’ve just started a mixing session. That puts you in the position your ears will actually be in.
Marking Only the Speaker Edge
Many beginners mark only the cabinet edge of the speaker when they see it in the mirror. The reflection point that matters is actually the tweeter, since that’s where the high frequencies originate and those are the frequencies your ear uses for imaging. Make sure you can see the tweeter (or the waveguide around it) in the mirror, not just the woofer or the cabinet side.
Ignoring the Ceiling Reflection Point
Around 70 percent of untreated home studios have neglected ceiling reflections. We’ve measured ceiling bounce adding 6 to 10 dB of coloration at the listening position, even when side walls are treated. If you treat your side walls but skip the ceiling, you’ll be left with the same comb filtering problem just shifted to a different frequency band.
Treating Too Small an Area
First reflection points are zones, not points. A single 1 by 1 foot patch of acoustic foam is rarely enough. To effectively absorb the reflected energy, your treatment should cover at least the entire vertical band where the tweeter is visible in the mirror, plus a few inches on either side. For most small rooms, that means panels at least 2 by 4 feet for side walls.
How to Treat Reflection Points After You Find Them?
Once you’ve used the mirror trick and identified every reflection point in your room, the next step is treating those spots with acoustic panels. The choices you make here depend on your priorities, your room, and your budget.
Absorption vs Diffusion
Absorption panels soak up reflected sound energy and convert it to a tiny amount of heat. They’re typically soft materials like acoustic foam, mineral wool, or fiberglass wrapped in fabric. Absorption is the right call for the earliest, strongest reflections from your side walls and ceiling, because you want to eliminate the comb filtering those reflections cause.
Diffusion panels scatter reflected sound in many directions instead of absorbing it. They keep the room sounding lively and natural while still preventing focused reflections. Diffusion works better on the rear wall and sometimes the front wall, where late reflections add ambience without causing comb filtering.
For a typical bedroom producer or home studio, start with absorption at all first reflection points on the side walls and ceiling. Leave the rear wall either untreated or treated with diffusion. This balance keeps your room from sounding too dead while removing the worst acoustic problems.
Panel Sizing and Placement
Panel size depends on the wavelengths you want to absorb. Lower frequencies have longer wavelengths and require thicker, larger panels to control them. For high and mid frequencies (which is what first reflection points on side walls and ceilings care most about), 2 inch thick panels are usually sufficient.
For side wall first reflection points, panels should be at least 2 feet wide by 4 feet tall to cover the vertical band where the tweeter is visible in the mirror. Mount them centered vertically on the reflection point, leaving a few inches of margin above and below.
Ceiling clouds above the mix position should be similar in size, hung horizontally between the speakers and the listening position. Many producers use a 2 by 4 foot cloud directly above the desk and another smaller panel between the speakers for full coverage.
Priority Order for Treatment
Not every reflection point is equally important. If your budget is limited, treat them in this order to get the most improvement per panel.
Side wall first reflection points (left and right) – highest impact on stereo imaging
Ceiling reflection point above the mix position – significant clarity improvement
Rear wall behind the listener – reduces late reflections and slap echo
Front wall behind the speakers – usually a lower priority, consider diffusion
Corner bass traps – address low-frequency buildup separately from reflections
Treating just side wall and ceiling first reflection points will fix most of the imaging and clarity problems in your room. Adding rear wall treatment tightens things further. Bass traps and corner treatment address a different category of acoustic problem, often improving bass clarity in ways that reflection point treatment alone cannot.
Frequently Asked Questions
How do you calculate first reflection points?
You don’t need to calculate them. The mirror trick finds first reflection points visually without any math. Sit in your listening position, have a helper slide a mirror along the wall, and mark every spot where you can see the speaker’s tweeter in the reflection. That spot is your first reflection point. The position depends on where your speakers and listening seat are, not on formulas.
How does the mirror trick work?
The mirror trick works because sound reflects off walls at the same angle it hits them. When you sit in your listening position and see your speaker reflected in a mirror flat against the wall, you’re looking along the exact path the reflected sound travels to your ears. Mark that spot and you have found the first reflection point for that surface.
Where are first reflection points located?
First reflection points are typically located on the side walls between your speakers and your listening position, on the ceiling between the speakers and the mix seat, and sometimes on the rear wall behind you. They fall roughly halfway along the path between speaker and ear, plus or minus a few inches depending on speaker placement.
How do you find reflection points by yourself?
To find reflection points solo, tape white paper to the wall at speaker height. Mark your seat position on the floor. Sit down and use a laser pointer or flashlight held near your ear to trace the line to the wall. Mark where the line lands. You can also use the mirror laid flat on the floor method or any phone tripod with a small mirror mounted on it.
What is the minimum panel size for first reflection points?
The minimum effective panel size for first reflection points is roughly 1 by 2 feet, but most acousticians recommend 2 by 4 feet for side walls and ceiling treatment. Smaller panels only catch part of the reflected energy and leave comb filtering in the gaps, so larger is generally better up to the point where the panel covers the full reflection zone.
Should I absorb or diffuse first reflection points?
Absorb first reflection points on the side walls and ceiling, where early reflections cause comb filtering and blur imaging. Use diffusion on the rear wall behind you, where late reflections add natural ambience without harming accuracy. Front wall reflections are usually weak and can stay untreated or use diffusion.
Final Thoughts on Finding First Reflection Points
Learning how to find first reflection points with the mirror trick is one of those rare skills that costs almost nothing and changes how every recording, mix, and listening session sounds in your room. The technique is older than most acoustic measurement software, and it remains the fastest way to find exactly where your acoustic treatment needs to go.
We recommend starting with side wall reflections, then moving to the ceiling, then the rear wall if your budget allows. Use the solo mirror trick methods if you don’t have a helper nearby. Once the marks are on the wall, you’ll know precisely where to install acoustic panels and why every panel improves your listening experience.